Key Takeaways
-
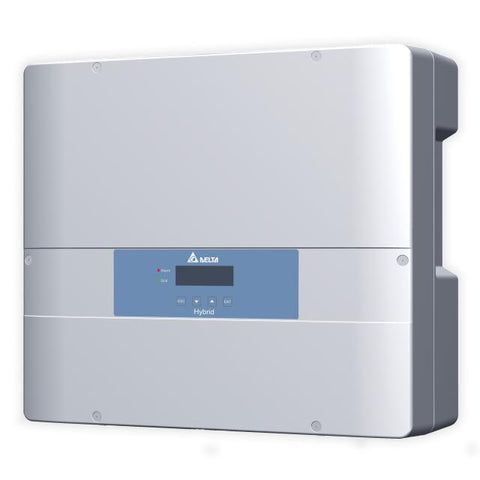
The Delta H2.5 is a grid-tie transformerless solar inverter ideal for residential use.
-
Installation should only be done by certified electricians or individuals with a solid understanding of electrical systems.
-
Choosing the right location for the inverter is crucial for optimal performance and safety.
-
Proper connection of the solar panels and the AC grid to the inverter is essential for the system to function.
-
Regular maintenance and troubleshooting are necessary to ensure the inverter’s longevity and efficiency.
So, you’ve decided to take a leap into solar energy and have chosen the Delta H2.5 inverter for your home. Smart choice! This compact and efficient inverter is a great piece of technology that will help you harness the power of the sun. But, before you can enjoy the benefits of solar energy, you need to get your new inverter up and running. Don’t worry, I’m here to guide you through each step of the process.
What Is a Delta H2.5 Solar Inverter?
First off, let’s talk about what the Delta H2.5 inverter is. It’s a piece of equipment that converts the direct current (DC) electricity generated by your solar panels into alternating current (AC) electricity, which is what powers everything in your home. This model is known for its efficiency, reliability, and as the name suggests, it’s transformerless, which means it’s lighter and typically has a higher efficiency rate compared to transformer-based inverters.
Why Choose the Delta H2.5 for Your Home?
You might wonder why the Delta H2.5 is a good fit for your solar setup. Besides its high efficiency, it’s also user-friendly, with a simple installation process and a monitoring system that allows you to check your solar production from your phone or computer. It’s an excellent choice for residential installations where space and ease of use are important.

Gathering Your Tools and Materials
Checklist of Essential Tools
-
Drill with various bits
-
Screwdriver set
-
Wire stripper
-
Wrench set
-
Personal protective equipment (PPE) like gloves and safety glasses
Before we dive into the installation process, make sure you have all the necessary tools on hand. It’s like cooking; you don’t want to start without all your ingredients ready. Having the right tools will make the process smoother and safer.
Materials Needed for a Secure Installation
-
Mounting brackets
-
Conduit and appropriate fittings
-
Wiring for both DC and AC connections
-
Disconnect switches
-
Grounding equipment
Materials are just as important as tools. You’ll need mounting brackets specifically designed for the Delta H2.5, proper wiring, and safety equipment like disconnect switches. Don’t cut corners here – using the right materials is crucial for a safe and effective installation.
Location, Location, Location: Mounting Your Inverter
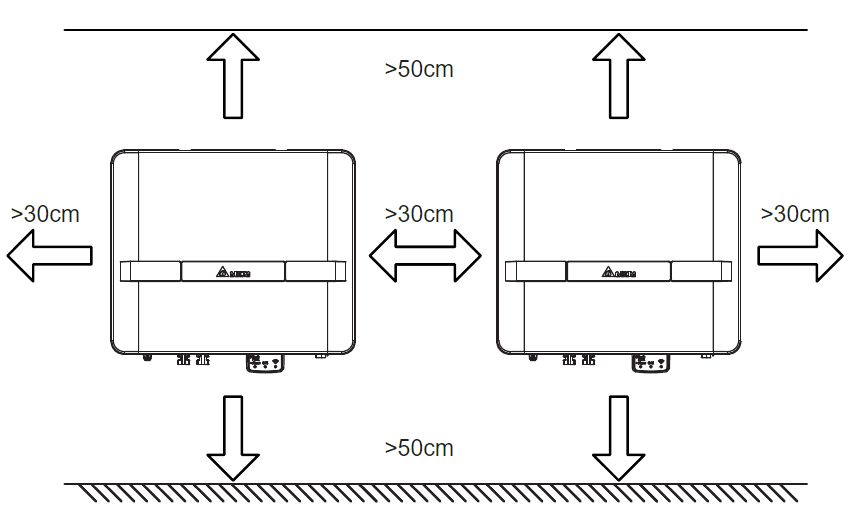
Identifying the Ideal Spot for Your Inverter
The best place for your inverter is somewhere cool and shaded, as it can get quite hot in the sun. You’ll also want it to be close to both your solar panel array and your main AC panel to keep wiring as short and straightforward as possible. Think about accessibility, too; you’ll need to be able to reach your inverter for maintenance and monitoring.
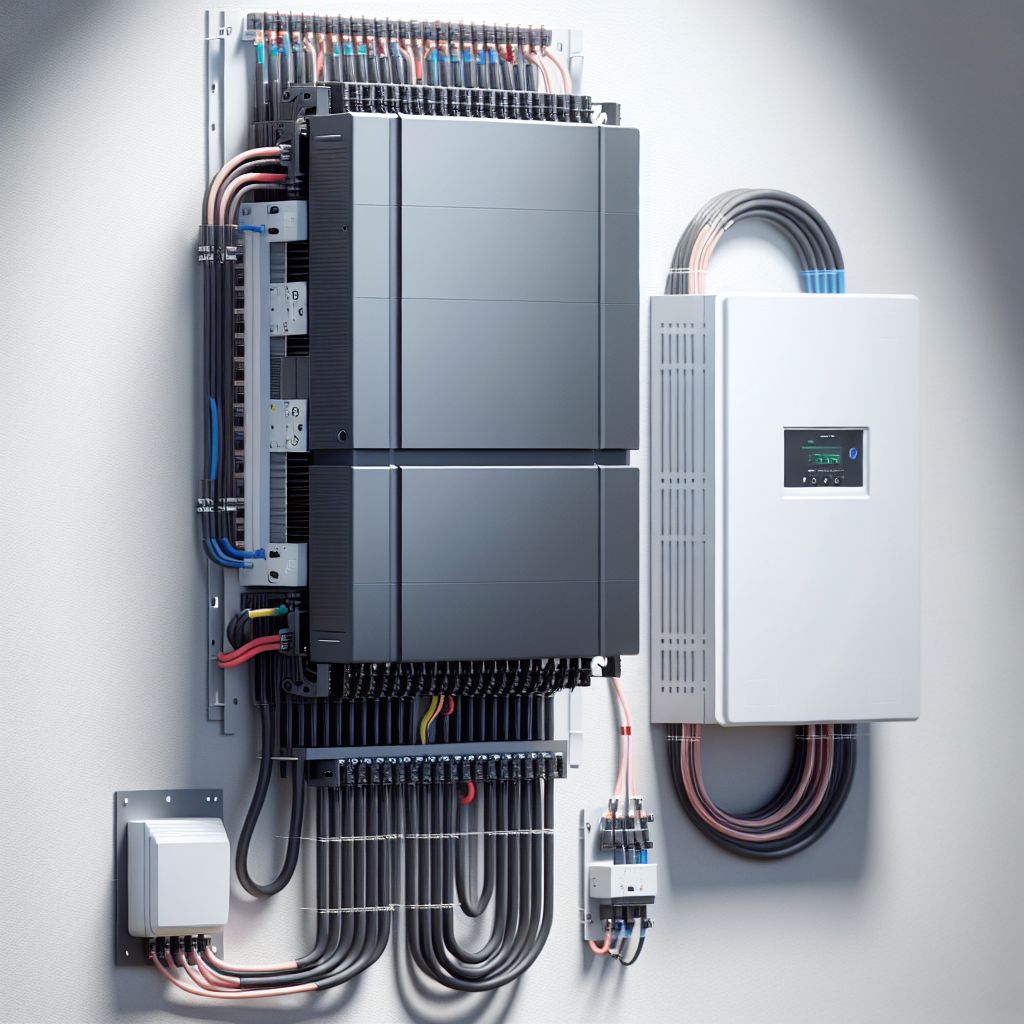
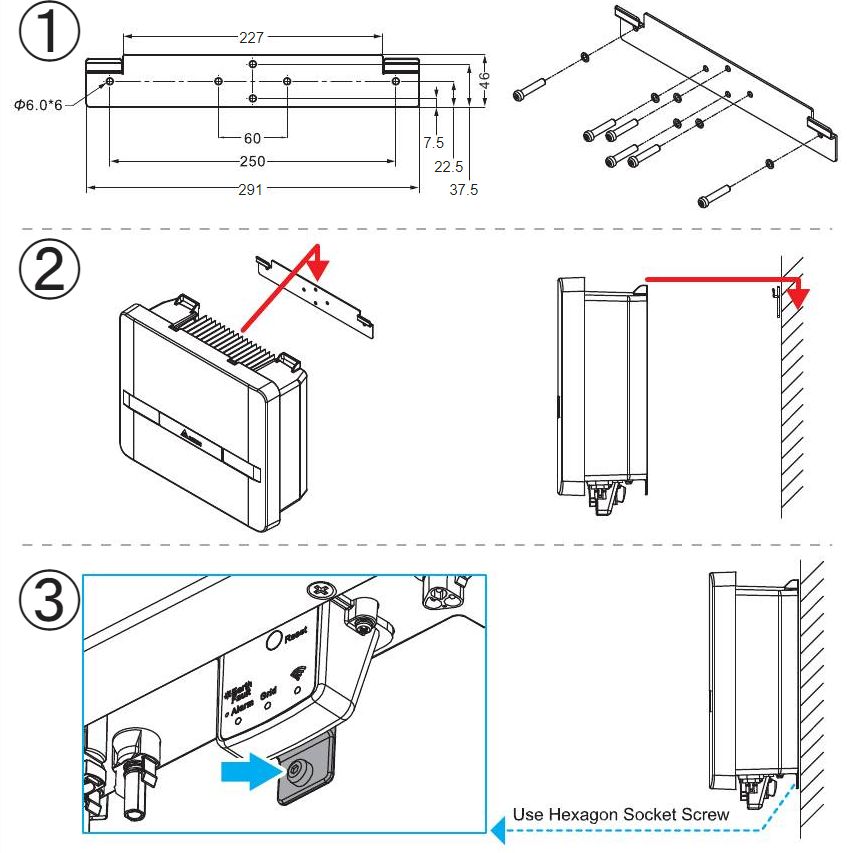
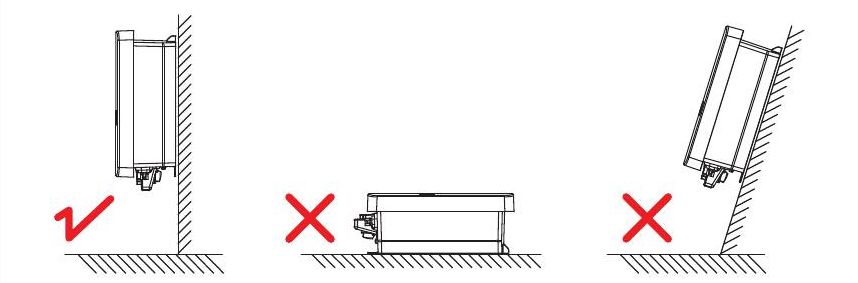
Mounting the Inverter Safely and Securely
Once you’ve found the perfect spot, it’s time to mount your inverter. This is where those mounting brackets come in. Make sure you’re securing the inverter to a wall that can support its weight, and that it’s properly aligned. Use a level; even a small tilt can affect the inverter’s performance. Safety first, always.
Remember, while the steps I’m outlining might sound straightforward, working with electrical systems can be dangerous if you’re not experienced or confident in what you’re doing. If you’re ever in doubt, it’s best to consult with or hire a professional electrician to handle the installation. Your safety is paramount.
Step-by-Step Guide to Connecting Solar Panels to Inverter
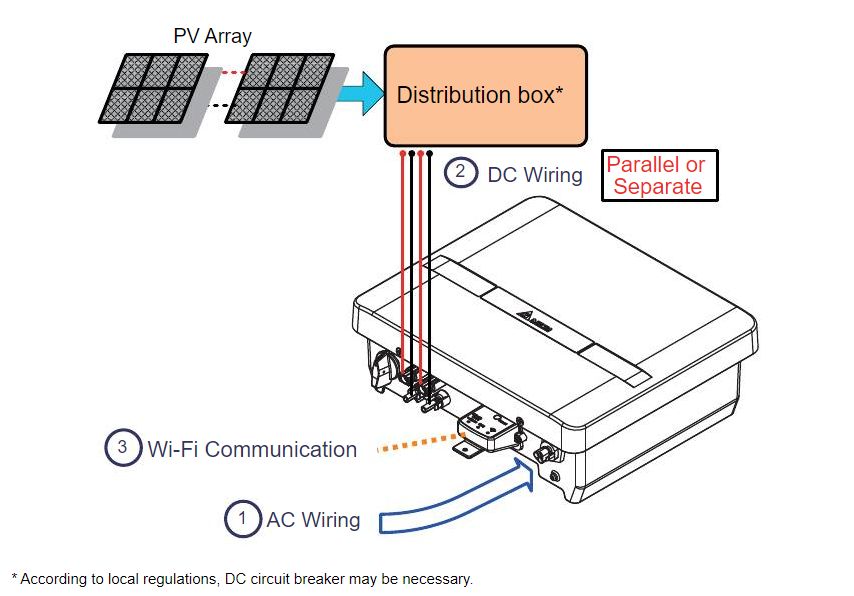
Now that your inverter is securely mounted, let’s connect it to your solar panels. Begin by ensuring all power sources are turned off. Safety is your top priority, so double-check that the solar panels are not generating any power before you start wiring.
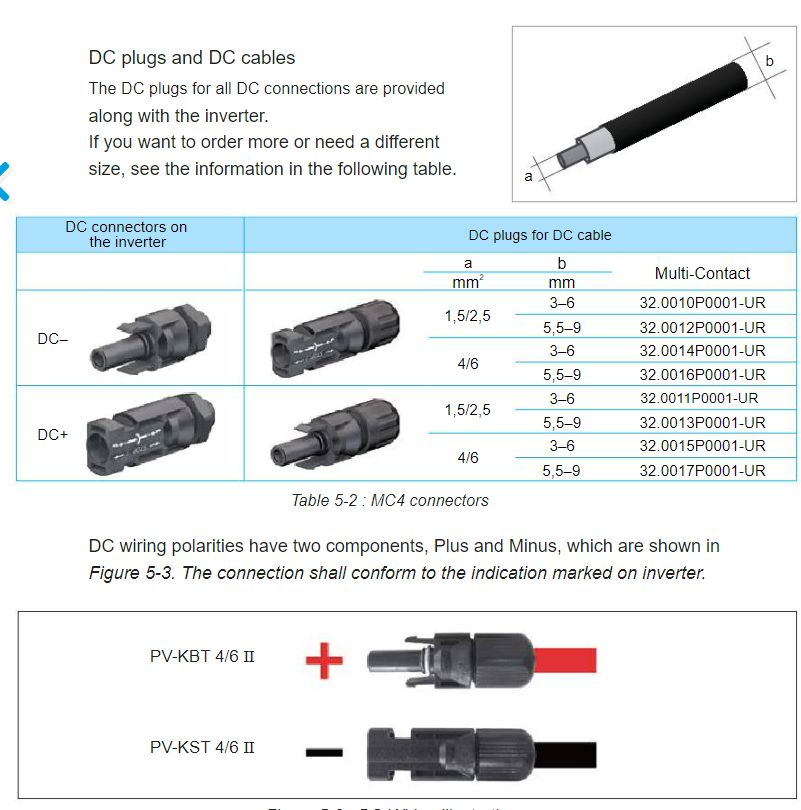
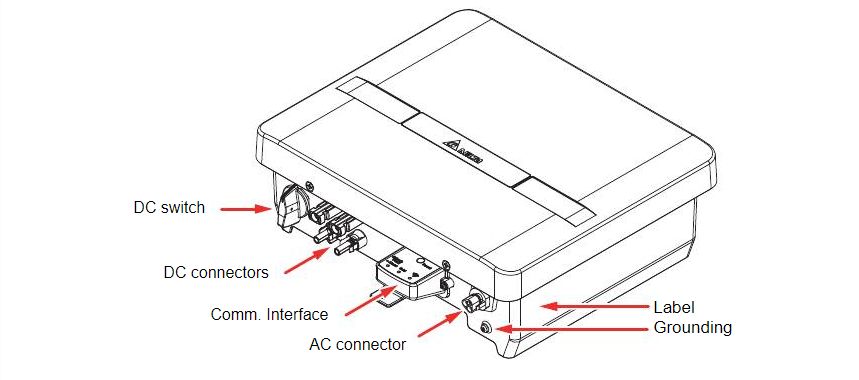
Locate the DC input terminals on your inverter. These will be clearly marked, usually with a plus (+) and minus (-) to indicate polarity. It’s crucial to connect the positive wire from the solar panels to the positive terminal and the negative wire to the negative terminal. Mixing these up can cause serious damage.
Use the appropriate cable size that matches the specifications of your inverter and panels. Secure the connections, and make sure there is no loose wiring. A loose connection can lead to inefficiencies or even a potential fire hazard.
-
Turn off all power sources before beginning.
-
Connect positive and negative wires to their respective terminals.
-
Ensure all connections are tight and secure.
-
Use the correct size and type of wiring as specified.
Powering Up: Finalizing the AC Connection
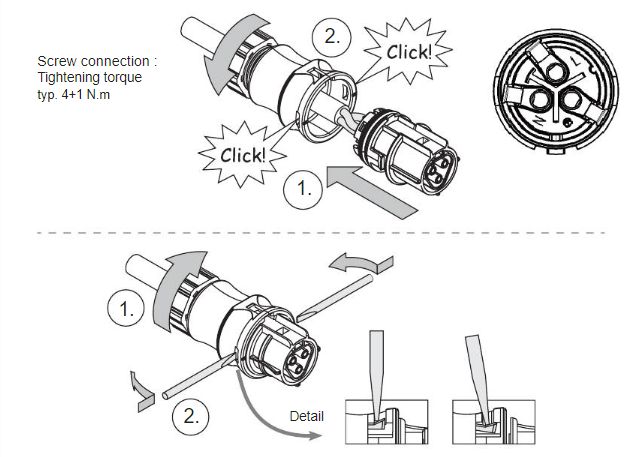
With the DC side connected, it’s time to hook up the inverter to your home’s AC power grid. This is a bit more complex because you’re dealing with higher voltages and currents. Start by identifying the AC output terminal on your inverter.
Run conduit from the inverter to your main AC panel. This will protect the wiring and anyone who might come into contact with it. As you wire the inverter to the AC panel, it’s critical to match the wiring to the breaker that’s appropriate for the inverter’s output. Incorrect wiring can overload the system, leading to tripped breakers or worse.
AC Wiring Guide for a Resilient Configuration
Example: If your inverter’s output is rated at 20 amps, you’ll need to connect it to a breaker that can handle at least that current. Using a 15-amp breaker, in this case, would be unsafe and non-compliant with electrical codes.
Once wired, double-check all connections for security and accuracy. It’s a good idea to label your wiring, so you or any future electrician knows exactly what each wire is for. This step is not just about functionality; it’s about creating a safe environment for anyone interacting with the electrical system.
After securing the AC connections, install any necessary disconnect switches. These switches allow you to safely disconnect the inverter from the power grid for maintenance or in an emergency.
Finally, ground your inverter. Proper grounding is essential to protect your system from lightning strikes and power surges. It’s also a critical safety feature that helps prevent electric shock. For detailed instructions, refer to the Delta H2.5 Installation Manual.
Testing Your Connection and Initial Turn-On
Before you flip any switches, give your system a thorough visual inspection. Check all your connections once more to ensure everything is tight and correctly wired. Now, it’s time to power up.
Turn on the disconnect switches and the breaker to the inverter. Then, switch on the inverter itself. You should see indicators on the inverter light up, signaling that it’s operational. If your inverter has a display, check for any error messages and confirm that it’s showing the correct output readings. For more detailed guidance, refer to the Delta H2.5 Operation and Installation Manual.
Smart Monitoring and Control
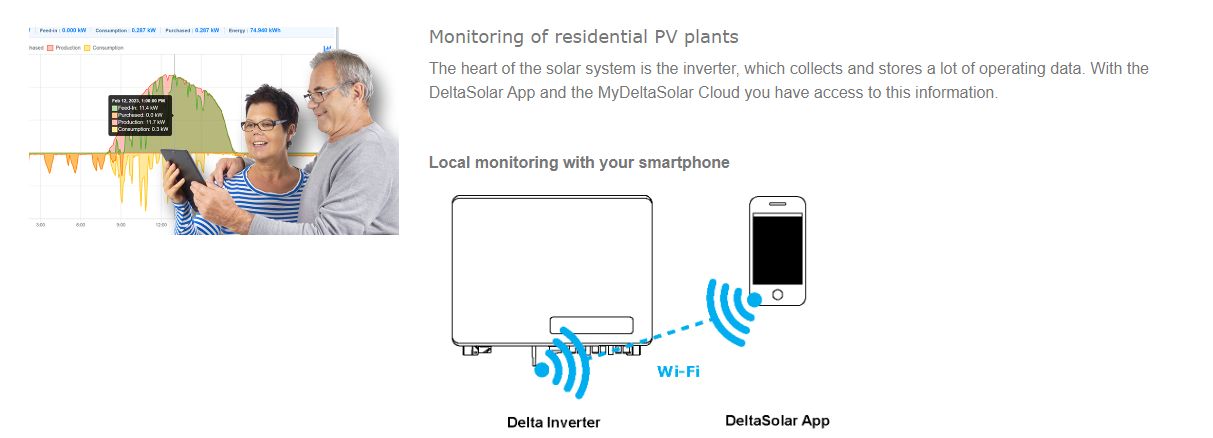
One of the perks of modern inverters is the ability to monitor your system remotely. The Delta H2.5 comes with built-in monitoring capabilities, which means you can keep an eye on your solar production from anywhere.
Setting Up Inverter Monitoring Through App or Online Portal
Download the app or visit the online portal provided by Delta. You’ll need to create an account and register your inverter using its serial number. Once set up, you can view real-time data, historical production, and more. It’s a great way to stay informed about how much energy you’re producing and consuming.
Most importantly, remote monitoring lets you quickly identify if something’s not working correctly. You can address issues promptly, often before they become bigger problems.
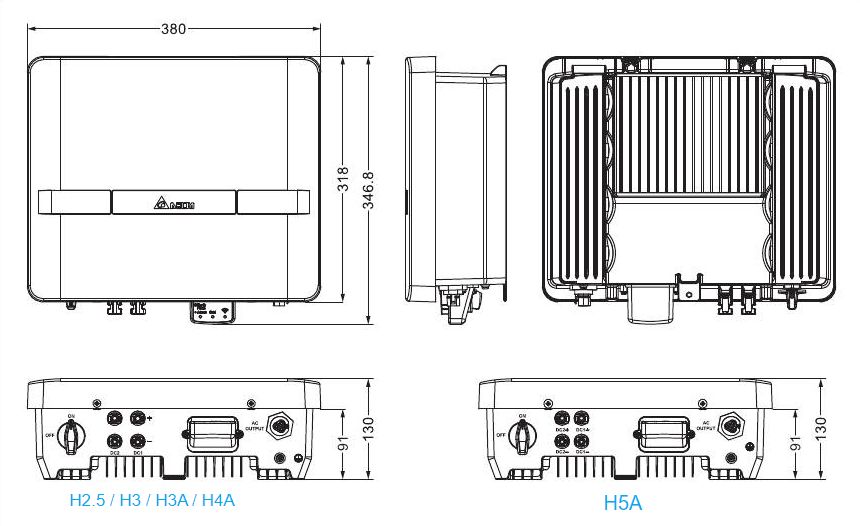
Delta H2.5 Solar Inverter Specifications
|
Feature |
Description |
|---|---|
|
Inverter Type |
Grid-tie Transformerless Solar Inverter |
|
Model |
SOLIVIA 2.5 AP G3 AU-IN |
|
Ambient Temperature Range |
-25°C to +70°C |
|
PV Input DC Voltage Range |
30V to 500V |
|
Efficiency |
Up to 97.5% |
|
Cost Range |
$1,000-$2,000 |
Source: alma-solarshop.com/260-delta-solivia-inverter#/
Interpreting Your Inverter’s Data Outputs
As you monitor your inverter, you’ll see various data points. Here’s what they typically mean: For more detailed insights, you might want to read our 5-10kW solar inverter guide which can help you understand the efficiency and performance of your solar power system.
-
Production: How much power your solar panels are generating.
-
Consumption: How much power you’re using from the grid versus your solar panels.
-
Efficiency: How effectively your system converts solar energy into usable power.
Understanding these metrics will help you optimize your solar energy usage and potentially save money on your electric bill.

When Things Don’t Go as Planned: Troubleshooting
Even with a perfect installation, you might encounter issues. Don’t panic; often, these can be resolved with some basic troubleshooting.
Common Post-Installation Issues and How to Fix Them
If your inverter isn’t turning on, first check to make sure all disconnect switches are in the ‘on’ position and that the breaker hasn’t tripped. If everything looks good there, consult the inverter’s manual for specific troubleshooting steps or error codes.
Decoding Error Messages on Your Inverter
Delta H2.5 inverters have a series of error codes that can help diagnose problems. For example, an ‘E01’ code might indicate a grid voltage error. Refer to the user manual for a list of error codes and their meanings. If you’re unable to resolve the issue, it’s time to call in a professional.

Preserving Your Investment: Maintenance Tips
Your solar inverter is a long-term investment, and with the right care, it will serve you well for years. Here are some maintenance tips to keep your Delta H2.5 running smoothly.
First, keep the area around your inverter clean and free from debris. This helps prevent overheating and maintains proper ventilation. Check connections periodically to ensure they haven’t loosened over time. And while the Delta H2.5 is built to last, it’s wise to have a professional inspect your system annually.
Remember, the Delta H2.5 inverter is a sophisticated piece of equipment. While it’s designed to be user-friendly, respect the complexity of electrical systems and always prioritize safety in your maintenance routine.
By following these steps and keeping an eye on your system, you’ll maximize the benefits of your solar investment. Embrace the sun’s power, and enjoy the satisfaction of generating clean, renewable energy right on your rooftop.
When to Call a Professional: Expert Maintenance Advice
Even if you’re a hands-on person, there are times when it’s best to call a professional. If your inverter is consistently showing error messages, if you’re experiencing power outages that you can’t trace, or if you’re unsure about any part of the maintenance process, it’s time to get an expert involved. A certified electrician or a solar technician can provide peace of mind and ensure that your system is running optimally. Besides, they can perform a comprehensive check that might save you from costly repairs in the long run.
Key Tips for a Flawless Installation
To ensure a flawless installation of your Delta H2.5 inverter, planning and precision are key. Make sure you understand the electrical requirements and local codes. Use the right tools and materials, and don’t rush the process. Double-check all connections, and make sure your inverter is properly grounded. Always prioritize safety by wearing the appropriate PPE and turning off all power sources when working on the system.
Expert Insights on Ensuring a Smooth Installation Process
Here’s a pro tip: document your installation process. Take pictures or notes at each step. This documentation can be invaluable if you need to troubleshoot in the future or if you decide to upgrade your system. And remember, the orientation of your solar panels will affect the efficiency of your inverter, so consider the path of the sun when setting up your array.
Final Checklist Before Commissioning Your Solar Inverter
Before you commission your Delta H2.5 inverter, here’s a final checklist to run through:
-
Ensure all wiring is correct and secure.
-
Verify that the inverter is properly grounded.
-
Check that the mounting is stable and level.
-
Confirm that all safety devices, like disconnect switches, are installed and operational.
-
Test the system with a multimeter to ensure all voltages and currents are within expected ranges.
Once you’ve ticked off these items, you can power up your inverter with confidence.
FAQ
What Makes the Delta H2.5 Inverter Unique?
The Delta H2.5 inverter stands out for its efficiency, compact size, and transformerless technology. It’s designed for residential use and offers a user-friendly experience with easy monitoring and maintenance. It’s a reliable choice for homeowners looking to make the most out of their solar investment.
Can I Install the Delta H2.5 Inverter Myself, or Do I Need a Professional?
While it is possible for individuals with a good understanding of electrical systems to install the Delta H2.5 inverter themselves, it’s recommended that the installation be conducted by certified electricians. This ensures safety and compliance with all regulations.
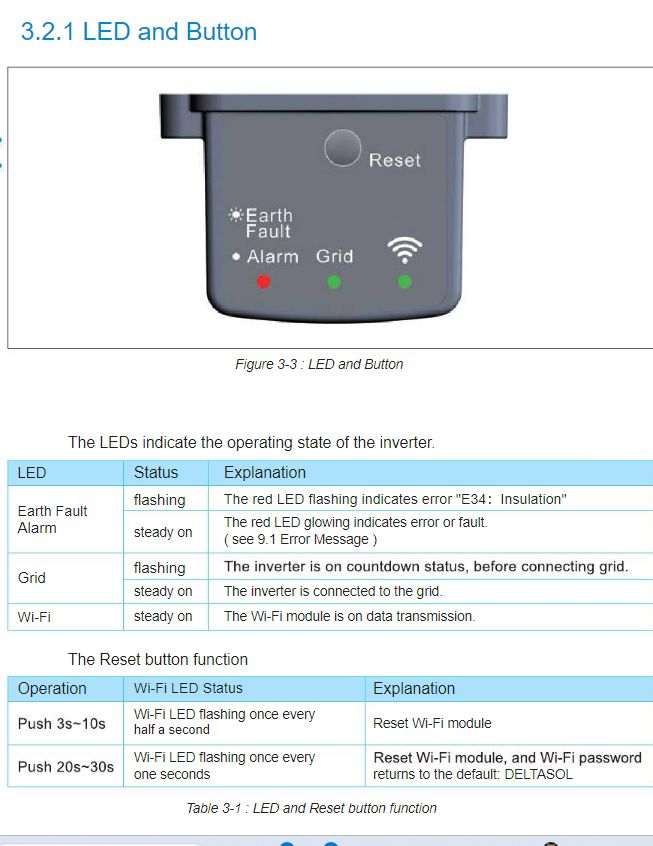
How Do I Know if My Delta H2.5 Inverter Is Functioning Correctly?
You can tell if your Delta H2.5 inverter is functioning correctly by checking the indicator lights and the monitoring system. If it’s operating within the expected parameters and there are no error codes, your inverter is likely in good shape. Regular monitoring can help catch any potential issues early on.
What Should I Do if My Inverter Displays an Error Code?
If your inverter displays an error code, refer to the Delta H2.5 manual to understand what the code means. Some issues may be resolved by resetting the system or checking connections, but if the problem persists, contact a professional for assistance.